Rounding out Dawksin

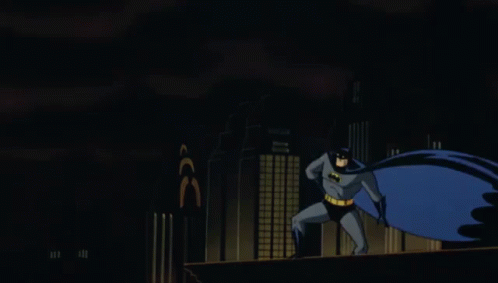
This week was all about adding some finishing touches to Dawksin

Some of the not-so-exciting things were some general bugfixes:

  • Pierce projectiles sometimes lingered around forever.
  • When leaving your grapple state, Dawksin would play a jump start animation instead of falling.

On the slightly more exciting side, we continued iterating on the grappling hook to make it feel better to use.

You can control your direction while grappling more towards the beginning of the move, and as you get closer to your destination you get less control.

He also tilts in the direction he’s moving

With the new addition of him tilting to match his velocity we figured his animation could look a little better, so we went ahead and updated that, and made it so you kick off the wall automatically.

so smooth!

Reticles

Next up was tackling the reticle for the grappling hook.

If you tap to activate grapple, you can target enemies, whereas if you hold to activate grapple, you grapple to terrain.

Since these are two different abilities smashed into one, we needed to communicate when you can activate either one, so we updated the HUD to accept multiples reticles per ability.

This let’s us do some fancy stuff. 😀

I’ve increase the size of the reticle so we can see what’s happening.

  • So now as you move over enemies you can see that they are within grapple distance.
  • If you move over terrain it highlights in yellow
  • And as you get closer, you can see they are within Pierce’s distance
oh my!, clarity.

Icons

I also started updating icons with more final art, and updated them to show how what state the ability is in.

Now during an ability we can say things like: This ability is ACTIVE! or you can RE-CAST this ability! or This ability is unavailable, or on cooldown, etc.


Stowing/Sheathing

Since we gave Dawksin a new state where he can sheathe his weapons, we started experimenting around with how this would work.

Initially we tried something like this where he would periodically sheathe his blades, and this little indicator would let you know when it was going to happen.

This wasn’t great though since it ended up being pretty distracting. It would also prevent you from doing any abilities while this was happening which didn’t feel very good.

So the next approach was to have him automatically stow his weapons when he performs an ability, which ended up not only feeling less intrusive, it also gives the player a chance to control when this happens.

The whole point of this anyway was to give Dawksin a damage boost when his weapons are sheathed so he get’s a little more upfront damage since his overall damage is low because he has so much power packed into his Recall ability.

Ability -> Sheathe -> Damage Boost

And finally to support this, I added a simple way to mark certain frames in our animations as either charge attacks, or empowered attacks, and they’ll reference a handy little table to lookup what kind of damage boost you get.

And that’s about all I had time for this week.

Oh also this week was the end of our kickstarter, and we made the goal!

We can’t thank everyone enough for helping us out, and we’ll keep doing our best to make sure y’all get a cool game :>

See y’all next week

A grapple a day

Since the last time I posted, we had a bunch of little small things fixed.

This time I got to finish working on pierce. Since the last time I talked about pierce, I noticed that there were some issues with it when it came to networking.

Because the game is going to be peer to peer, we need to make sure you’re projectiles still fly nice even while someone is ripping out your ethernet cord, or carefully constructing a faraday cage around your WiFi receiver.

The main thing that prompted this review of Pierce was some errors I was getting when testing networked.

That really handy target data I talked about before, didn’t like being replicated and was causing memory issues.

oh no

So I did what I normally do in these situations:

Let’s re-write the part of the engine that’s giving me trouble!

Me (with too much enthusiasm)

So just like melee, we ask the client for where they want to throw the projectile (and have the server validate that they don’t want to actually start the projectile in Antarctica), and then figure out where it needs to go on the server.

From there I made a handy little struct that acts like the TargetData that was misbehaving, and I tell it where it needs to travel to.

(but since this one is mine, and not Epic’s, I’m not allowing it to misbehave)
Nice

To wrap that up we are also re-using the projectiles so it’s only a little expensive the first time you use Pierce. Any other casts will re-use the projectile you already spawned and the response will be buttery smooth.

I then went ahead and finished part 2 of Pierce, the Hold version.
This one didn’t take as long as the main part was figuring out how to stagger the spawning, and re-use the projectiles, but yeah!


Jump Compression

Up next there was some weirdness happening anytime characters jumped, their feet would go through the floor, which was giving Anthony some headaches.

I figured I could tackle this in a procedural way.

We’re already using an IK Control Rig to adjust characters feet so they don’t clip through the environment, so instead of what we were doing (applying an additive compression animation) I figured we could just push up and down on their pelvis control which should mimic a little bounce from landing.

Kinda like that

So after setting up a little event detection in the animation blueprint, we can control how much each character recovers from a landing whether they’re walking, jogging, or sprinting.

the logic. Very hush hush.
In action

Grappling

Now for the main event, grappling.

In our last public build we had quite a few networking issues with Dawksin’s grappling hook, and this was the time to address it.

The ability logic was supposed to keep track of:

  • Launching the hook
  • Detect the hook landing
  • Reeling you in
  • Allow detaching mid-air
  • Allow Some control while moving

and the movement logic itself was also handling keeping track of:

  • Your location
  • Where the hook location was
  • How much control you get while moving
  • Self-Cancelling when you let go
the old functionality was um…. large.

It was fairly complex, and not easy to debug.

So this time we started fresh and said, ok let’s revisit what tools the engine has to do this. Turns out if we flip a few flags with our movement component, and tweak some of their movement tasks, we could make the hook a little easier to debug, and perform better under bad network conditions.

This is the big ol’ task I ended up repurposing. It looks a little imposing, but it has all the knobs and levers we need to adjust the hook.

oh, that’s a big function

If we take a look here, you can see the positions being calculated and interpolated to get you the control you want, while still moving towards the hook.

The nice thing about this is we should be able to hook onto moving targets!
But that’s for later.

And that about wraps up this week. See y’all in the next one

You Simply Can’t Rush Art

Howdy, its been a little bit. Over the past two weeks we got a bunch of small fixes done, but there wasn’t really anything significant to show or if there were a ton of small things done, there weren’t really good ways to show it.

Progress Report


GENERAL UPDATES

Dodging

The dodge ability was updated to allow each character to have their own dodge distance and duration. Before we thought it would be great to have a single dodge ability, and have everyone be equal for distance and time.

So then it turns out that was a really bad idea, because most of our characters are vastly different sizes. So uh, lets change that.

Behold, I present to thee… Settings!

So now each character can have their own distances for rolling while not locked on, and dashing while locked on. Regardless of whether its a dash or a roll , you can customize the distance of the initial burst of speed for the dodge, and then the sliding to a stop that they do afterwards.

Jump Compression

I had a whole thing written here about how we fixed the jump compression that was really wonky and having people’s feet go through the floor anytime they landed, BUT it turns out what we thought was going to work, ended up making them do the opposite.

Avert thine eyes

Now their feet hover instead, which is slightly better, but we’re gonna go back to the drawing board on this one.

Animation Blending

There was a small problem that we weren’t able to figure out for a while, where if you started or stopped walking, your characters legs would fly out in front of them for a split second.

I actually don’t have a video of it being horrible, so instead enjoy this smooth walk cycle that doesn’t do anything weird. HOW RELAXING!

This seemed really weird until we started looking into the jump compression stuff. Lo and behold, by default the character thought they were always sprinting. So anytime we start or stop walking, when they’re trying to figure out if they should blend into their idle animation, they started sprinting for a moment.

Not a huge bug, but one that did have us stumped for a while.

Orientation Blending

When you lock on to an enemy, your character plays new locomotion sets for walks and jogs. Typically we just had to make Forward, Left, Right, and Back. The animation system would blend these together to let you walk in the in-betweens, so diagonally in any direction.

The animations ended up not being able to blend very well if you switched your overall direction from forward to backwards. This would only happen if you’re walking forwards-right/left and switch to backwards-right/left. Going from forwards straight to backwards was fine. Its mainly visible if you’re locked on and moving around an enemy. As we should do, because the enemies are tall and imposing.

When you’re walking left and right and then moving forwards and backwards, you now have a new animation to blend with. Its not perfect, but it looks a lot better than before

So the solution here was to add two more animations ( two for walk and two for jog), that are front-facing. The standard Left and Right animations basically assumed that you were walking backwards before, so that made it impossible to blend nicely from the front.

Its more animations for each character, but it does help them look a bit less jarring when changing directions.

SHOLD UPDATES

Shold got a new IK Rig that let us begin porting over all of his old animations.
This gets us 90% of the way with his animations, except that it didn’t quite fix up everything it should have.

His Sholderpad (get it? SHOLDerpad) is down to his thigh and his weapon is hovering ominously below his hand.
Truly a tribute to the strength of his sheer will to destroy his enemies.

This means we get to go ahead and fix this manually for 290 animations. Yay.

FIA UPDATES

Model Updates

Fia had some skinning issues where her shirt was clipping through the decorative neck brace and the brace wasn’t staying intact when her head moved.

Ignore the ugly colors, focus on the immaculate skinning corrections

That was stopping us from moving her head and neck at all during any animation, so it was a good time to fix it.

Added in Fia’s dagger as well, so she can stop using the default ritual dagger.

How Fancy

That Dagger looks as long as a sword

Shhhhhh

Completely ignoring the fact that I like to oversize all weapons, its important for weapons to be a bit longer than you’d typically expect, to make sure they they actually have a chance to hit the enemies.

Even the hitboxes for them are oversized to an extent, to make sure that it hits when you expect it to, instead of missing by an inch or two and feeling like you got cheated.

Animation Updates

Oh baby, we finally have some custom animations for Fia. Started things off with new locomotion animations for walks, jogs, sprints, jumps, and turn in place. She finally animates differently than the initiate.

Behold she no longer slouches like that bandaged weirdo

In addition, got her melee attacks finished as well. Typically characters have somewhere between 3-4 attacks for their melee combo, but Fia is all about attacking as much as she can to lower the cast time on her spells. More hits = faster spell casts, so uh, I gave her 11 attacks.

The more you flip your knife, the deadlier you are

The Initiate has 4 attacks, Dawksin has 7, and now Fia has the most. Still might need to play around with this number, and possibly the timings, but it feels pretty good at the moment.

Wait, can you even chain that many hits in a row without getting interrupted?

I highly doubt it, but wouldn’t it be cool?

Look, the important thing here, is that I got excited about making attacks and they’re already done. Relax.

Also since she’s meant to be really flashy in combat, she does knife flips all the time. This was actually a bit challenging , since each animation had to know the orientation of the knife from the previous one, but I think it came out pretty neat and it helps sell her persona.

Still have to work on her heavy attacks and whatnot, but that should be done pretty quick. Next update shouldn’t be delayed.

See ya’ll next week.

They have six eyes, bro.

During the SparkInSpace interview (starting at 2:03:00 in the VOD), Spark reminisced about experiencing how good the Ai is during the Mortal Rite Playtest and Demo.

Clip with sound from the SparkInSpace interview.

In Mortal Rite, we have Ai that ranges from fodder enemies that are only difficult when in large number to Ai that, one on one, are supposed to be as challenging as fighting against another player.

In previous talks with Spark, he pointed out that fighting against the Sword Knight is like fighting against a real player in PVP. The Sword Knight will parry, dodge, retreat, do combos, etc. Spark didn’t realize how deep the Sword Knight Ai went until he spent a while fighting it in the arena.

Sword Knight

In the future, I will take the time to go deep into how the Ai works because we’ve put a lot of work in it and it would be cool to do that. But today I am going to go through making the Sword Knight Dodge work in the new project.

One of the rules for the new project is that anytime we can make an ability (everything is an ability: jump, dodge, attacks, etc.) work for both the player and an enemy, we should. This keeps everything simpler than it would have been and means that if there is a problem with an ability not working, and we fix it for the player, it would also be fixed for the enemies. In the previous Mortal Rite project, we had specific Ai Abilities that players could not use and we ran into issues where we’d have to fix issues in both places. Not great.

The Goal

  1. Allow the Ai to determine which way to dodge based on obstacles in the world including other enemies, players and structures.
  2. Be able to control which way a specific Ai can dodge. The Sword Knight specifically wants to dodge away from its target (backwards, back left, or back right) while the Axe Knight wants to dash towards its target (forward left, forward right).
  3. Build this functionality into the dodge ability that the player uses so that we can use the same dodge functionality and systems for both the player and the Ai.

#1 – Which direction to dodge

Translate dodge direction and current location into cardinal direction.

The player uses current acceleration in order to determine which way to dodge. The player’s current acceleration is provided by the controller input(s) that the player is making. We don’t have that from the Ai. The dodge ability uses GetCardinalDirectionFromTransformAndDirection() to translates the player’s current location and current acceleration (in the form of Dodge Direction) into a cardinal direction: North, Northeast, East, Southeast, South, Southwest, West, Northwest. Basically, 8 directions. The player will need to choose which way they dodge using their controller input and then the dodge ability picks up on that while the Ai needs to choose a direction, translate that into the same cardinal direction, and then use the same player dodge logic.

The way we chose to implement this for the Ai is to have the same dodge ability run an Environmental Query via Unreal Engine’s Environmental Query System.

EQS_Q_Dodge Query


The EQS_Q_Dodge query simply does the following:

  1. Generate a circle with 8 points (one for each of the cardinal directions) evenly spaced around the Ai with a radius equal to the distance that the Ai can dodge.
  2. Test for the points being pathable so that the Ai can reach it. If a point is not pathable, reject it.
  3. Test for the points being in line of sight. If a point is not in line of sight, reject it.

The results from this EQS Query are the locations that the Ai should consider dodging towards.

EQS Dodge Query results: Yellow: Locations that passed the EQS Query Tests.

#2 – Control which way the Ai can dodge

Once we have an array of unobstructed, in line of sight locations that the Ai can dodge to, we translate these locations into directions. Then we use location of the Ai and those directions in place of the current acceleration that the player used to generate the cardinal directions.

Iterate through the returned locations, create the directions, use the directions to get the cardinal directions.

At this point we have an opportunity to filter out the undesired directions. By defining a whitelist of cardinal directions for each Ai it allows us to only accept the desired directions.

Dodge ability settings for the Ai
Only accept the directions that are in the ‘Ai Allowed Directions’ list.

Accepting all directions allows all directions to be randomly selected.

EQS Dodge Query results – Blue: possible dodge locations; Green: Chosen Dodge Direction (south in this case)

Changing the allowed directions list to only allow South (back), Southwest (back left) and Southeast (back right) results in the Ai only being able to dodge in those directions.

Sword Knight’s proper dodge settings
Yellow: EQS Locations; Blue: Possible dodge locations

The EQS Query takes care of obstacles so that if a location is obstructed or not in line of sight then that location is rejected.

Wall causes potential points to be rejected.

Putting everything together and playing as the Sword Knight with debugging on we can see everything working together to give the functionality that we desire.

Note: animations, timings… pretty much everything is still being worked on for the Sword Knight’s dodges so that it’s nice and smooth, but this illustrates the functionality.

Playing as the Sword Knight to test dodge functionality.

#3 – Put everything into the base dodge ability

Combining everything into the base dodge ability and adding in a check for playing as a player so that we only use the Ai logic when an Ai uses the ability ends up looking like this:

Player Dodge ability with the addition of the Ai Logic necessary to support use by both Players and Ai

So, there it is. The rest of the story is having the Ai recognize when it should use a dodge ability, which is a bit more complicated and something that will have to be covered later.

Just Ai Things

This week I worked on making Placers easier to work with in the editor.

What was wrong with them? I’ll tell ya!

Placers spawn in the Enemies as needed in the Editor, but previously needed an external actor – Enemy Manager Helper – to setup the enemies. Problem this caused was that anyone working with levels and enemies needed to put in a placer and an Enemy Manager Helper in order to setup levels. That’s extra steps. As many times as we go over the steps to setup enemies in a level it’s not something that we get to do daily and when people don’t do things regularly or it’s not their focus, they forget.

The future was not having to do anything more than have placers.

Placer with a Sword Knight in a test level.

Enemy Manager Helper used to have all events that able to be called in the editor to do the following: Setup Enemies, Delete Enemies, and Validate Enemies.

Setup Enemies deleted all of the enemies in the level to make sure that everything was clean and then setup all of the enemies that the placers needed in the level. But, due to silliness, Setup Enemies did not clean up soft references properly (Oops). Setup Enemies needed to be clicked on manually by a developer each time you made a change to any enemies in the level. Tedious.

Delete Enemies deleted all of the enemies and was used by other functionality – like Setup Enemies – to clean out all of the enemies in the level currently. Problem with this was that it didn’t properly clean up soft references between placers and enemies. That’s bad.

Validate Enemies validated all of the locations of the enemies and color-coded the placers based on whether they were in good places or not. A similar function – Validate Spawn Location – was used to validate a single placer.

So, that’s all boring, but that was to illustrate the previous setup and show that there was room for improvement.

I ported all of the Helper’s functionality to the Placer itself. Put all of the logic in functions instead of in events and updated everything so that everything used the new functions. While I was at it, I also cleaned up the Patrol Point functionality so that everything that someone needed to use that was previously spread out between Placers, Helpers and Patrol Points were now just on the Placers (Patrol Point functions were left on the Patrol Points too because that’s convenient). Looks like this:

Placer, Helper and Patrol Point functions on the Placer itself.

I also cleaned up the names of the functions to just be better.

We now have:

  • SetupEnemies() – to setup all enemies in the level
  • DeleteAllEnemies() – to delete all enemies and clean up the soft references, but to leave the Placer’s configuration in place so that SetupEnemies() can be used directly after if needed.
  • SetupThisEnemy() – Setups up just this placer’s enemy.
  • DeleteThisEnemy() – Deletes just this placer’s enemy.
  • Validate() – Validates all spawn locations for all placers.
  • ValidateThis() – Validates spawn locations for just this placer.
  • AddPatrolPoint() – Adds a new patrol point.
  • DeletePatrolPoint() – Deletes a patrol point.
  • CloseLoop() – Closes the linked patrol points into a loop so that the enemy will loop through the patrol points.
  • OpenLoop() – Opens the linked patrol points so that they are no longer in a loop.
Placer Details View with the clickable functions via Call In Editor.

Much cleaner. Now anyone can just drag out the placer, choose the enemy they want and click SetupThisEnemy() or SetupEnemies() and be done.

But can we go further? That’s still a lot of steps to setup an enemy. What if just choosing an enemy automatically set it up? And what if anytime the user had to choose from a long list of tags they only saw the tags that were relevant?

Placer settings.
Filtered list of Enemy Tags to choose from instead of all of the tags.

Choosing a valid tag from the filtered enemy tag list will now automatically setup the enemy and clearing the tag will automatically clean up the enemy. Users no longer need to user SetupEnemies() or DeleteAllEnemies()!

PostEditChangeProperty() – Very useful.

This was done by hooking into PostEditorChangeProperty(), which is called anytime a setting is updated. Setup the logic that you need for each case, and then you’re set!

In our case here, I wanted to identify anytime the Enemy To Spawn tag changed and then call SetupThisEnemy(). SetupThisEnemy() is a Blueprint Function so it had to be called in a fancier way than just calling a native C++ function. Since this is Editor Time stuff and performance doesn’t matter, there’s no real need to move the function to C++ in the form of a BlueprintNative or BlueprintImplementable function.

PostEditChangeProperty() implementation where we call SetupThisEnemy in BP from C++.
Easy Enemy Setup

At the end of the Placer changes we have a much cleaner user experience that will save time and with better validation because there are no bad soft references.

All the small things

This week I was running around fixing a bunch of things all at once.

Networking

So since the editor let’s us test under less then desirable conditions we’ve started testing what systems break down under lag.

fancy network testing options

Because of this one of the things we found wasn’t reliable was damage, which I think we can all agree is pretty important. If you take a swing at an enemy and they ignore your damage, no one’s gonna be happy.

There were a few things that could be causing this, one of them which I suspected was causing this, is your weapons only count when the server/host sees a hit happen. While this is great for preventing cheating, if feels pretty terrible and isn’t exactly great for performance.

If we continued down this path it would mean the host would need to tick everyone’s animations perfectly otherwise the game feels unresponsive.

So how do we get around this so combat feels fair and it’s still hard to straight up cheat?


Client side hit detection

So I took a look at how the Lyra project was handling similar things, like shooting/melee since its pretty similar.

Turns out they have a nifty way of sending hit data were it can still feel responsive, while still sending it to the host to verify you didn’t just hit someone from across the map.

So I extracted the relevant parts, and now we can send hit data from your client. Yay!

classic target data

Once the server gets the data, it double checks to make sure the hit was even possible, and then applies damage. Nice!


There will be Blood

So up next was handling hit effects. Up till now we’d been using the Lyra defaults which gave us sparks anytime we hit characters.

So Anthony ported our blood emitters from our previous project, and we spawn it anytime characters are hit.

(Positioning was easy thanks to last week’s post)

One of the funny side effects of this was since effects are triggered from damage, destructibles were bleeding as well.

There’s blood in my metal

I recalled something that could help me out with this. As I was reading through the ability system source code, (You know, a thing normal people do) I came across the Gameplay Cue Translator.

Turns out this handy little class can translate gameplay tags from one form to another, in this case letting us mutate the more generic tag to a more specific one.

…What?

you (probably)

So the vfx tags we send across the system tend to look something like this

GameplayCue.Object.DamageTaken

That’s great and all, but like you saw above, that means anything that takes damage will play the blood effects. If we use the translator, I can add rules that depending on what we hit, it’ll update what tags get sent. So now it’ll end up sending either:

GameplayCue.Character.DamageTaken

or

GameplayCue.Destructible.DamageTaken

Which lets us handle effects differently per object type. Nice!


Back to blood though. The little squibs of blood are cool, but we also want the decals to show what a mess you’re making. I started to add decals directly beneath the enemy that was being hit, and it looked ok, but kinda weird considering the blood was gushing out and appearing –directly- beneath your enemy.

I tried adding some traces to kind of figure out roughly where we should place the blood, but it was kind of a mess. Then it hit me.

WHAT IF WE ADDED A BALLISTIC TRAJECTORY TO DETERMINE WHERE THE BLOOD SHOULD FALL?

Luckily this was actually super easy to add.

behold. cannonball technology

With this we end up nice a nice trace for world geometry that lets us know where the blood would have fallen according to a given velocity.

oh yes.

Now we add a placeholder decal to test that it’s rotated the correct way

The decals are aligned towards the character, which helps the blood to look more aligned. It’s definitely not perfect, but it should get us most of the way there.

So replaced with the actual decals, it looks more convincing


Finally the last thing I worked on this week was tweaking how we handle fire effects. Rod has been handling most of the effects work, but this particular effect was giving him some trouble so I thought I could help a bit here.

Fire effects are going to be a pretty important part of Fia, so I went ahead and tweaked how the fire sprites behave when in motion. The most important thing here was to give it left and right motion, which we can see the beginnings of here.

whoosh

I think it came out alright.

The last thing I happened upon this week was batch importing animations.

Since we’ve been going through and cleaning up animations, I wanted a way to batch import any animations that we exported from Unreal into Akeytsu (our animation software)

Typically the whole process sucks since Unreal exports animations individually, and Akeytsu accepts one file at a time, so when you’re dealing with 100 animations, going through that many dialogs and having to manually rename each one since Unreal exports the name as “Unreal Take” no matter what, I figured there had to be something I could do to make this smoother.

Turns out Blender let’s you batch import files, which does solve one of the problems, but the naming problem was still there.

I wondered if I could edit how Blender imports .FBX files.
Turns out, the importer is a python script.

How very editable…

Me

So all I had to do was find where it handled the names, and replace it with the name of the actual file.

Who knew I’d be doing this today?

But with that done, I was able to import the animations in minutes instead of hours.

yay!

Anyway, that’s all I got for this week. See ya’ll next time.