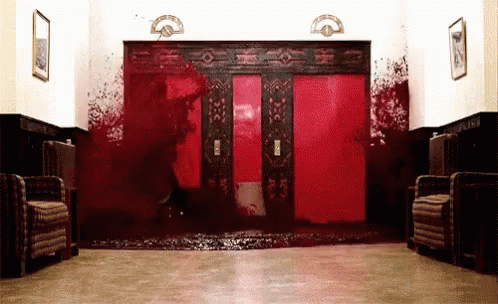
When you hit an enemy it’s fun to see that you really smacked that enemy.
Hit Reactions: Good.
Blood splattering: Good.
Effects when you hit the environment: Good.
Removing armor is also good. Let’s do that.
Le Sword Knight
All characters have the concept of Health Thresholds that can be setup to trigger things happening. In the case of Sword Knights, Health Thresholds are used to trigger when their armor comes off.
Health Threshold Configuration. There are more than just one for the Sword Knight.
Enabled: Toggle this threshold. Usually like to have enables on everything so that it can be isolated for testing.
Percentage: Percentage health to trigger this threshold
Material Slot: The material slot for the armor that needs to be removed.
Socket: Location where the effect will be played so that the armor looks like it’s breaking from the correct place.
We can choose to setup any enemy to lose armor or anything visual based on their current health, but today I am focusing on The Sword Knight.
The Sword Knight’s armor has been setup with different material sections so that we can hide each section whenever we want and we’ve chosen to do this when the Sword Knight’s health reaches certain thresholds. At the same time that the armor is hidden we also set off a Niagara effect that shows his armor flying off and landing nearby.
Like destructibles?
You, an avid reader of the Mortal Rite dev blog
Yup. Like Destructibles.
It’s perhaps misleadingly simple:
Damage happens
Threshold met
Hide the armor
Play the effect
Decrease the enemy’s armor so that future hits do more damage
Back in the time long, long ago, in the previous Mortal Rite project, we had fully functional placers that allowed for control over what mode an enemy used when spawned. The options were something like Normal, Guard, Melee, Patrol, Ranged, Ready, Wander, Debug, Test Abilities Only, Test and Initial Abilities, Special Use 1, Special Use 2, Arena Mode 1, and Arena Mode 2. You know, just off the top of my head.
Old Tricks.
Spawn Mode Options in Previous Project
Spawn Modes
So many spawn modes. Most of them ended up not being used because of what we ended up needing.
Do Not Use: Don’t use this.
Normal: Spawn the enemy with normal functionality.
Guard: Spawn the enemy so that they guard an area and pick up targets on damage or vision.
Melee(Not used): Spawn the enemy so that they prefer melee combat.
Patrol: Spawn the enemy in patrol mode moving from patrol point to patrol point.
Ranged(Not used): Spawn the enemy so that they prefer ranged combat.
Ready: Spawn in a ready to attack stance rather than going through a spawn animation that takes time.
Wander: Wander around to random points within a range.
Debug: Reacts to damage and picks up on targets. No attacks or movement.
Test Abilities Only: Whatever the test abilities are setup up as.
Test Abilities and Initial Abilities: Whatever the test abilities and Initial Abilities are setup as.
Special Use 1(Not used): Abilities that are defined in special use 1 for this enemy.
Special Use 2(Not used): Abilities that are defined in special use 2 for this enemy.
Arena Mode 1(Not used): Arena 1 abilities that are defined for this enemy.
Arena Mode 2(Not used): Arena 2 abilities that are defined for this enemy.
Spawn Criteria
Old Tricks: Spawn Criteria
Spawn Criteria determines when an enemy will spawn.
Immediately: As soon as Enemy Manager initialized and there was an enemy available in the enemy pool (pools are no longer needed in the new project).
Placer Event: An event such as a death event from another placer’s enemy. Allowed spawning in new enemies to fight when one or more other enemies diead.
Trigger Volume: When a player or enemy overlapped with a trigger volume.
Proxy: When a proxy triggered, which could be because of any placer event or trigger volumes. Pretty much anything that called the trigger of the proxy.
Wave Spawner: When the wave spawner determined that the enemy should spawn. Wave Spawner was only ever seen for a little bit, but has gone the way of the Dodo because it wouldn’t open doors to let players proceed when needed and we ran out of time to fix it for the previous playtest(s).
New Dog.
New Dog: Spawn Mode & Trigger Mode
The new placer now has the following spawn mode options:
New Dog: Spawn Mode Options
The only spawn modes that we are going to use are Debug, Guard, Patrol and Wander. Special 1 through Special 3 are reserved for any special handling that we need, but we may not need to use these special settings because in most cases it’s easier just to make a different enemy that does what you need it to do.
Example is if you want an enemy to do something specific. Something specific means a new ability or multiple new abilities that a version of an enemy has that the basic enemy does not have.
Because everything is really modular in the new project it’s really easy to add a new Ability Set that has the new ability or abilities that you need in it and then define new rules for the Ai so that the Ai uses those abilities. New Ability Set and New Ai Rules are just two configuration files. The abilities would need to be created, but those would have to be created for the older system as well. This is a net gain.
Trigger Mode
New Dog: Trigger Modes
Trigger Mode is what has replaced Spawn Criteria and there are literally just two options for this: Begin Play and External Call.
Begin Play is what it sounds like: when the Game/Level begins.
External Call is also what it sounds like: when something, anything, external to the placer determines that it’s time for the enemy to spawn.
Tools
Having the ability to spawn an enemy in a specific mode at a specific time is necessary for us to be able to control when a player will face enemies. So, I made some tools to help with this that replace the plethora of tools that helped with the old placers.
Ai Death Actor
Red Cube: Ai Death Actor. Green Cubes: Placers.When N Death Placer enemies die, spawn N Placer enemies.
Probably need a better name for this, but this guy just cares about when things die and when those things die it spawns new things. Simple.
Ai Death Actor in action.
Ai Trigger Actor
Pink Cube: Ai Trigger Actor. Green Cubes: Placers.When Linked Trigger Volume is overlapped, spawn N Placer enemies.
This guy just cares about when a trigger volume is overlapped and when that trigger volume is overlapped it spawns new things. Also simple.
Or is it….
Ai Trigger actor can use tags to filter out things that shouldn’t trigger spawns. If you only want a player to trigger spawns or if you only want a specific faction of enemy to trigger spawns, this is the way. This tag filtering is similar to how we filter what can and can’t destroy Destructibles. Still simple, I think.
Ai Trigger Actor in action.
Now with feeling
Of course Ai Trigger and Ai Death actors can be used in sequence. For the above videos the configurations were the following:
Sequence of enemies spawned in on death using Ai Death Actor.Sequence of enemies spawned in on trigger and then death using Ai Trigger Actor and Ai Death Actor.
Ai Vision is what determines whether an enemy can see a target or not, and it’s trickier than I thought.
First, when I started working on Mortal Rite, I had not ever worked on creating Ai for a game so creating an Ai that works well and meets or exceeds the Ai in other established games was an order taller than Shold. Shold is tall. Bigly tall. I was eager to make a really good Ai so I went for it and have been learning the whole time.
Mortal Rite Steam update about the Road Map being released. Shold(left) is super tall compared to normal sized humans, and this image doesn’t even do his height justice!
What does Ai Vision do exactly?
Enemies need to be fair and predictable for players to have a good gaming experience. This means that a player should expect an enemy to acquire their character as an attackable target when it is in line of sight(LOS) and within a certain range.
Easy enough: The Ai just needs to do a line trace to see if a target is visible (e.g.: Not blocked by something that should block sight). Trace from the location of the enemy’s eyes to the location of the potential target. Record whether or not the target is in line of sight and that helps determine if the enemy should attack that target or not.
Line Trace Logic, sort of.
Hol’ up. What are potential targets?
You, the reader.
Right. What are potential targets?
Potential targets are… targets that are attackable. Done.
Me
Real talk: How do we know what targets to trace against? We use the teams system built into Unreal Engine to control what is hostile to what. Entities on the same team are friendly. Entities on different teams are hostile. There are roughly two types of targets that an Ai should worry about:
Characters – Other enemies that are hostile or players that are hostile.
Destructibles – Objects in the world that can be destroyed (such as barrels, obstacles (walls potentially)) that are hostile. By default all destructibles are hostile to all characters.
Characters are fairly easy because we maintain a list of the characters in the world that the Ai can iterate through and choose the hostile characters. EZ.
Destructibles are fairly easy to get as well. I chose to use a sphere trace so that each Ai only needs to worry about destructibles within its attack range. Originally I used a sphere trace for Characters as well, but that’s silly when I have a curated list of characters at my disposal.
Get Targets. Are targets in LOS?
Non-Characters are more tricky. If we want an Ai to be able to do damage to a destructible and have the capability of destroying a destructible, we need that destructible to be hostile relative to the Ai. Hostility gates direct damage. This presents a new problem which is that if we put a lot of fun destructibles all over the world, the Ai will potentially run around killing those destructibles rather than fighting the player.
Solution to the Ai running around killing destructibles is to not allow the Ai lock on to those targets. Destructibles that the Ai cannot lock onto are destructibles like barrels, torches, some walls, etc.
Lock On Interface
The Lock On Interface exists to determine what entities can lock on to other entities such as when a player locks on to a Sword Knight and you can see the little white dot that shows you are locked on to that target. Abilities (everything you can do in Mortal Rite is an ability, basically. Even melee attacks.) can then be made to reference the lock target or not.
Locked on to a Sword Knight
The Lock On Interface uses one or more Target Points, which are literally placed on the model by a developer, to indicate what parts of a target can be locked on to. In the case of the Sword Knight the target point is in the middle of his
Target Point (the RGB Axis Gizmo) on the Sword Knight in the UE5 editor.
I updated destructibles to allow them to be locked on to by:
No one – For things like barrels (fodder)
Only Ai – Player-created asset like Shold’s Wall
Only Players – A barrier that only a player needs to destroy to get somewhere
All
This means that we can have destructibles that only exist to be environmental fodder that accidentally gets destroyed or a player can choose to destroy just because. But most importantly an Ai will ignore it.
Updated logic flow becomes…
Ai Sight Logic with Hostile and Lock On checks.
Wouldn’t it be cool…
Someone in the office
Probably both the best and worst thing to hear around the office.
…if an enemy couldn’t reach its target because of a destructible it would swap to the destructible and destroy it to get to its target?!
A younger me
How hard could it be? Destructibles are already tracked by the Ai and attackable by the Ai. Now I just have to figure out what is blocking the Ai’s current target and, if the blocker is attackable, increase the blocker’s threat so that the Ai prefers that target over the Ai’s current target! Genius.
Updated logic flow!
Logic flow with Block threat and Blocker Threat resetting.
So this basically works. Other Alex showed off the Ai at this point in a TikTok video a while ago where an Evil Initiate attacked a wall in order to get to a target. It was a short clip, but it worked at that point.
The original scope of “The Ai should attack obstacles to get to targets” was Shold’s Great Wall that cuts off vision to the Ai’s target and also cuts off Navigation Mesh so that the Ai knows that it cannot move through the wall.
What’s navigation mesh, precious?
Gollum
Navigation Mesh is a procedurally generated mesh based on rules (such as radius and height (size) of an agent using the navigation mesh) that determines where an Ai can path. Navigation Mesh can be pre-computed so that at runtime it doesn’t have to be computed. Navigation Mesh can also be updated at runtime when obstacles move around so that Ai knows that it cannot path through moveable objects at runtime. Pathing calculations use Navigation Mesh in order to know where it can potentially path instead of having to compute pathing against the world’s geometry itself. Navigation Mesh is basically a simplification.
Green bit is the Navigation Mesh.
New Ai Vision Smell
What’s new is:
Better Multiple Target Point Evaluation
Better Base Target Threat
Better Reachable Evaluation
Multiple Target Point Evaluation
In the time long, long ago we determined that it was necessary to have multiple target points for larger targets such as the Constructor Boss. It was bad that players could only lock on to a single point on the Constructor Boss because it caused bad camera interaction. Solution was to add multiple Target Points and Alex updated player lock on logic to allow smooth cycling through those Target Points. It sounded like a good solution, but honestly wasn’t something that I thought I would like. But I do like multiple target points and I am happy that we have it.
What it means for the Ai is that the Ai can also have access to multiple target points for targets that are large. Since everything is modular and target points are defined by the Lock On Interface, it’s really simple to add N Target Points as needed.
Random Wall Destructible with multiple Target Points (yellow hand drawn Xs)
What’s really useful about multiple target points for the Ai is that it helps address a problem that most people probably wouldn’t think about: Whether an Ai can reach a target to attack it.
Half of this game is 90% mental.
LOS is only half of the “Can the Ai attack a target” equation. The real question is “Can the Ai see a target and can that Ai get to a location that allows it to attack that target”. The Ai has two types of attacks at a really high level: Melee attacks and Ranged attacks. When an Ai decides what it can do it needs to know if it can use a melee attack or a ranged attack against a target. Part of Ai Vision Logic is determining if a target is Melee Reachable or Ranged Reachable.
Melee Reachable: True if there is a pathable location that is within the Ai’s attack range to a target.
Ranged Reachable: True if the target is in LOS and within Missile Range.
It might be becoming clear that all of the above Ai Vision logic talk was really just scratching the surface of what the Ai is actually doing, but I felt I needed to cover all that to setup a foundation for the real problems that I’ve solved recently.
A problem caused by needing to be within range of a target in order to attack it is that for large targets that have one target point the Ai may or may not be able to get within range of the target point, but it can get in range of the target’s location. This looks like the Ai should be able to attack the target, but the Ai, trying to be smart, is overthinking the situation and rejecting the target because it can’t reach the target point.
One target point near the pivot of the asset is attackable.Level designer flips the asset 180 degrees for visual reasons
Multiple Target point handling allows the Ai to dynamically choose the best target point for a target. This happens every evaluation so that the Ai can handle a moving target that has multiple target points and have a better chance to always be able to attack that target.
Evaluate the best target point and use that.Ai can’t see the two target points that are near the bottom because they are below the terrain. If these were the only target points then the Ai wouldn’t be able to see the target at all.Multiple Target Points being evaluated by Sword Knight.
Base Target Threat
Originally the threat table assumed that any target with 0 threat should be removed. Everything on the Ai’s threat table was either Threat greater than 0 or Threat equal to 0. After talking over all of these issues with Alex, Alex suggested adding an way to define base threat per target. So, a player would have a higher base threat than a destructible, but the destructible still had to have a base threat of 1. This would allow an Ai to choose a player, which is a more desirable target for the Ai to attack, over a player. And BAM, now the Ai chooses the Players over the Destructibles when they are evaluated at the same time.
The original base threat change was good, but the ultimate solution was to allow Ai to track targets that have 0 threat and not reject them. The new paradigm is everything with Threat greater than or equal to 0 stays on the threat table and anything less than 0 is removed. Also, anything that has a threat of 0 is not chosen as a target.
Boiling this down with everything else talked about:
Targets can have multiple target points that allows them to be attacked because at least one target point will be in LOS and reachable
Destructibles start with 0 threat, which allows the Ai to track them, but prevents Ai from attacking them when they are the only targets.
Targets gain threat when they are a blocker of a target that the Ai wants and therefore becomes the Ai’s priority when they should be.
Blockers reset their threat when they are no longer blocking a target so that the Ai resumes its pursuit of the real target: the player.
Better Reachable Evaluation
Multiple Target Points allow for the Ai to better see targets that it could not see before due to a single target point being obstructed and also partially addressed the reachability issue because multiple target points increases the chance that a target point will be in range for the Ai (optimization for static targets would be to place fewer target points in better places than to just have a bunch of target points. Don’t worry: we’re not going to be stupid about the number of target points we use because performance is important).
It was because everything was working better that a new problem appeared: there can be obstacles on the ground that make a target partially unreachable for melee attacks.
In a setting where there is debris on the ground or anything that blocks a direct path to a target that is reachable in other ways the Ai would still decide to not attack that target, which is bad and makes the Ai look dumb. And we don’t want dumb Ai.
Nav blockers do not block LOS to Target, but do prevent the finding of a reachable location within range of the target.
The solution that I’ve put in place for this is to test a half circle of reachable locations from the chosen target point. This means that in the above case additional reachable locations would be tested to the sides of the red location.
The Ai can now reach the target due to the extra testable locations. As expected.
Conclusion. Finally.
This has become a long post. Hopefully interesting. Now for the system in action and potentially the TLDR of the whole post.
Everything in motion. Performance pretty horrible due to the unique way that Unreal Engine handles drawing debug shapes. Performance without the debugging is fine.
New progress this week / week and a half (I know I posted a little while ago).
We need some more blood my friend.
Abraham Lincoln
So to kick things off, as Anthony mentioned last week, we did have enemies spilling their contents on the floor, but boy oh boy, wouldn’t it be neat if also hit their meshes? We think so.
We had dabbled a little with a plugin that would let us do this in the last project, but we couldn’t get it working last time, but with a fresh set of eyes, we implemented it again, and voila, blooooood.
Yay it works! So basically what’s happening here is we find where you’re weapon hit, and we tell the system, “Please spawn a decal at this location, on this mesh”
very cool
But it would be a lot cooler, if it also splashed onto you. So we added one for the player’s mesh as well, and said hey let’s do a trace to figure out kinda where the blood would end up if it splashed from the hit location, back to you!
covered in sweet-n-sour sauce
So that’s pretty cool, BUT we didn’t want it to look like you were heavily bleeding from dealing damage to someone. So we figured we could differentiate a splatter, from a wound (for lack of better terminology).
The way we’d do this, is by having the wounds stick around for like 30 seconds, whereas the splatter would stick around for like 5 seconds. The only problem was the plugin didn’t differentiate.
uh oh
So I took a peek under the hood to figure out how it worked. Turns you can specify one image per mesh, which then gets drawn to a RenderTextureTarget.
This just means you can draw something to a texture real-time and do something with it. (In this case, projecting it to the mesh).
Since there wasn’t support for multiple textures, there also wasn’t support for different timings which is what I wanted for the splatter vs the wound.
no options… what’s that giant node?
So I took a look at the guts of that node and found out its…
HLSL
Hey a manual way of specifying how shaders are rendered. I’ve never worked with this before!
I’m not stressed about this at all
Pulling in Anthony, we took a deeper look into this code, and found that if you want to fade out the blood, it fades right away, and you can only specify how long the total fade time is.
So doing some quick math we figured out how to add not only an initial delay, (So it wouldn’t start fading right away) but also a switch for whether it was a wound or a splatter so we’d have a different timings for when the fade started.’
We’re reading texture data. How Fancy!
And so with that done, here’s a sped up version of the blood drying quickly
His arm dries up. Much like a desert
And so with that we move onto…
Defense
In the last demo we only had two defense types. Block or Parry.
We were talking about it and figured we could give more options depending on what character you choose. So what does that look like?
Block
Deflect
Parry
Perfect Block
Evade
So Block is what enemies typically have and for the most part it’ll stay that way, so not much is new there.
Deflect, the main goal for this is to avoid attacks if timed perfectly. This works well for smaller weapons where it wouldn’t make much sense to block.
Deflect in action
Next up is Parry, this is similar to what Dawksin had in the demo. If he successfully parries, he will ignore damage and perform a counter-attack.
Parry in action
Perfect Block, this is what Shold had in the demo. Arguably one of the strongest defense types since successfully timed blocks cause enemies to stagger. Useful for protecting your teammates
Perfect Block in action
And finally Evade, this will most likely end up being Fia’s defense type. Successful timing will result in you repositioning behind your attacker. (Thanks to Jensen for helping me work through this)
Evade in action
It’s using some of Dawksin’s vfx at the moment, but hey it works!
Now I could wrap it up there, but what about the part of the week where I hit road blocks with fundamental systems? Systems so vital, when they don’t work it ruins your whole experience? That’s right baby we’re talking about
Animation Locks
Animation locks are what determine if you’re locked into an animation or if you can break out of it and do something else. This is what lets things like chaining of melee attacks be possible, and having abilities not be interrupted mid-cast.
Version 1 of this system was in our last demo, and was notorious in multiplayer for failing when using Dawksin’s grappling hook, causing players to get stuck in a cast animation until they got hit by an enemy.
So we took another look at animation locks and implemented a pretty big change. Apart from reworking the whole thing into an ability so we could debug it better, we also made it so that locks ALWAYS have an expiry time.
This makes it to where even if the network hitches, or some ability flies off the rails in some crazy edge case, the lock WILL release.
Ultimately this ends up with us not needing to worry so much about getting stuck and some fancy new nodes for controlling when you can and can’t break out of animations.
fresh and exciting!
That last node also has some fancier functionality, to automatically read animations and find lock releases.
Here’s where Dawksin’s first attack releases the lock
Now I know what you’re thinking, wow Alex that’s a lot of stuff, we should end it here ri-
WRONG
I also went ahead and:
Updated Dawksin’s Reticle size so you could see more clearly
Fix a bug where anytime you got hit ALL OF YOUR PASSIVE ABILITIES GOT CANCELED
Fixed an issue where AI would cancel it’s own animation lock ability, making it get stuck forever.
Added in more entries to the Gameplay Cue Translator to allow different hit impacts which Anthony detailed in his blog post last week.
HIT ME WITH THOSE DIFFERENT MATERIAL TYPES
Fixed a bug where due to the new animation lock system dodge was no longer allowing dodge attacks, so a new “Dodge – Cancelled” ability was added that keeps your dodge state active for a little longer so you can chain an attack.
Fixed an issue where when blocking while locked onto an enemy with Shold his torso would kinda split in half.
Missed a week, but not because I was slackin. Lets get into it.
Small Feature Update
Last time we talked about all of the jump compression stuff and Alex had done a huge update to it, removing the need for individual animations on each character (yay!) This time we exposed a few more variables that he had that lets us customize it a bit further.
ooo Different Heights and Times. HOW MODULAR!
Now you can have different times that the character stays at their lowest point on a jump, based on whether or not they were walking, jogging or sprinting. Not a huge change, but one that makes all the jumps feel a lot better.
Material Updates
For materials we made a few minor fixes. Fia’s material was ignoring any part of the texture that didn’t have a color from the engine on it. Like her knives and the bottom of her boots. So now those don’t look like untextured shiny pitch black anymore.
This is after it was fixed, I forgot to get the one when it looked bad, and I cant even remember how to mess up the Master Material anymore to even see what it looked like. Trust me, its a lot better
Shold got his scarf back, now that we’re done with his skinning updates. He also had some updates to his physics asset, so he can simulate the scarf a bit better without it going through his arms and torso.
Back in Business Baby
We can now support blood decals on character after hits thanks to Alex. I went in and added the layer to all of our characters which started to push the material complexity a bit too far. Which means that I had to go in and optimize a bit to make sure that our materials don’t become too much of a burden for the engine.
It even splashes on to the attacker!
Which leads us on to…
Optimization Updates
When we make characters, we try to make them as high quality as possible, and leave optimization till later. Overall this is good, because the characters end up looking great, but also comes with that looming threat of optimization in the future that no one wants to think about.
After our last playtest and the several nights we spent rushing to optimize everything in a panic, I figured it was probably a good idea to get ahead of it this time. So Unreal has a handy feature that generates LODs for you.
What’s a LOD?
You, probably
LODs stand for Level of Detail. You’ve seen these in every game before, don’t lie to me.
LODs are those low detail models that pop in the farther you get away from something. They change the detail on the model because it assumes that you’ve gotten far enough that you shouldn’t notice a drop in detail, and it changes back to the higher quality one, the closer you get.
Its about a 70% reduction in triangles
The more levels in between, the smoother the transition.
Having these be lower quality helps the engine run faster because it has less geometry and less bones to animate, so less work overall. In addition we also needed to optimize the textures to save on memory. Memory as it turns out, is a pretty big deal. Most graphics cards don’t have a ton of memory to dish out, which means that we need to make the most out of the memory that we do have.
Most graphics card range anywhere from 2GB to 8BG of VRAM, which is a pretty big range. Meaning we need to plan for the worst and hope for the best. The closer you get to using all of your VRAM the slower your game will run. If you run out, that it slows down to an unplayable crawl and I weep bitter tears.
So, armed with that knowledge, what can we do?
Memory optimizations are a man’s passion
Albert Einstein
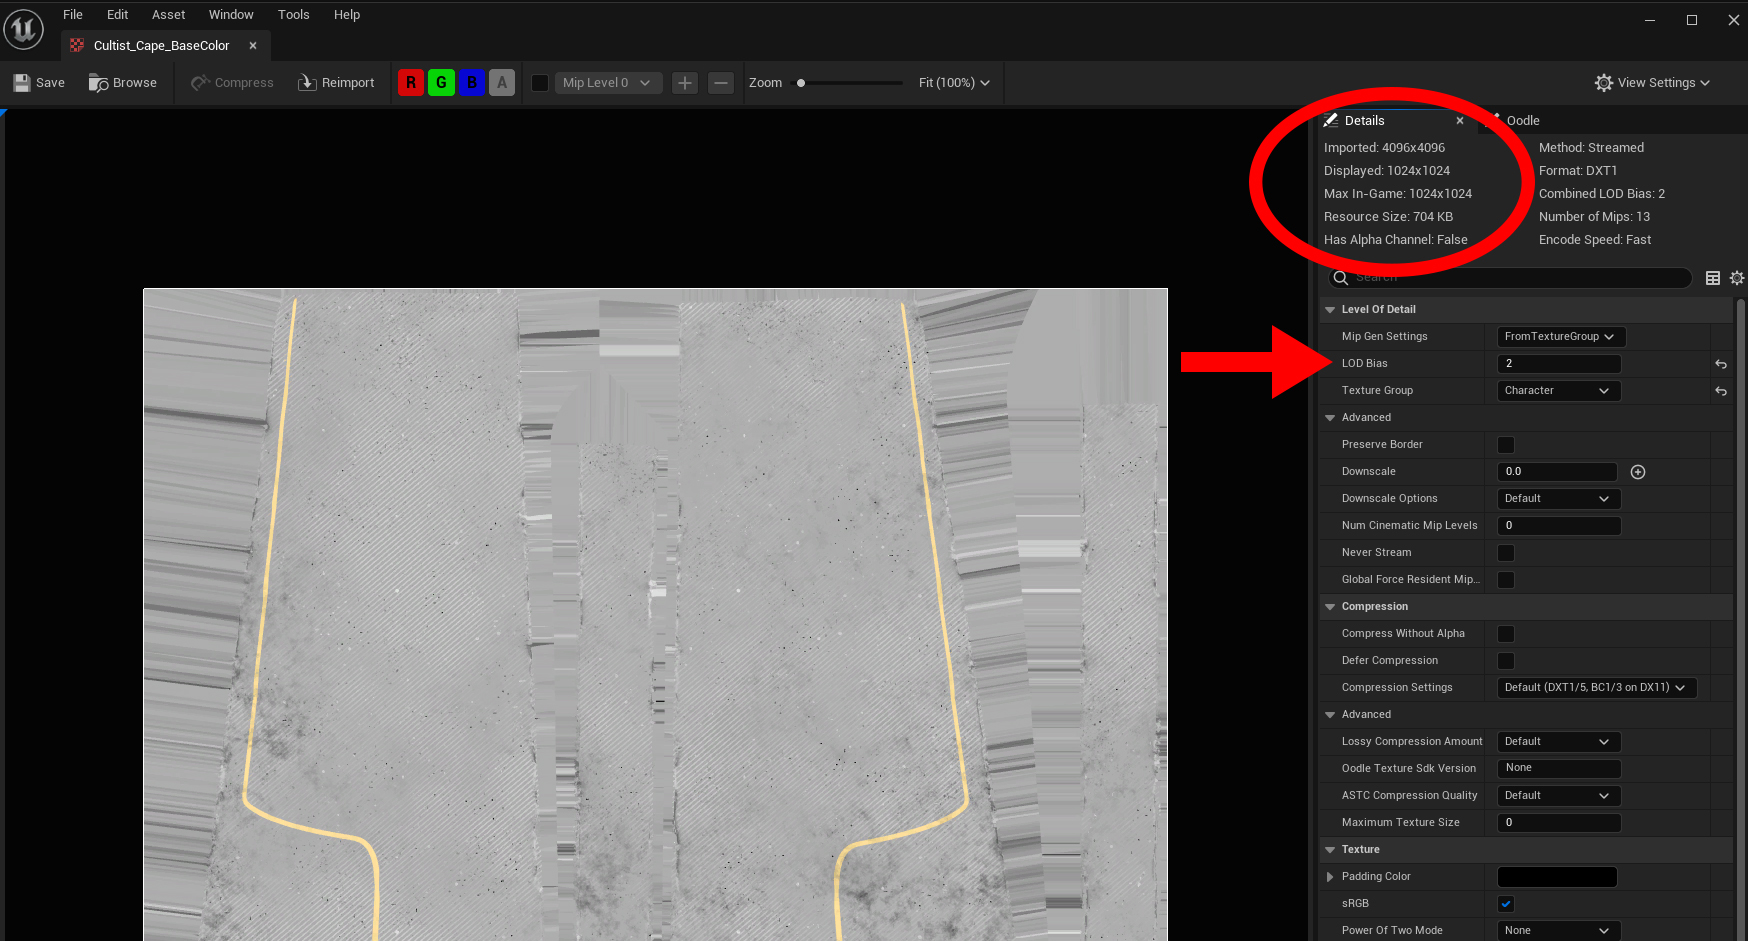
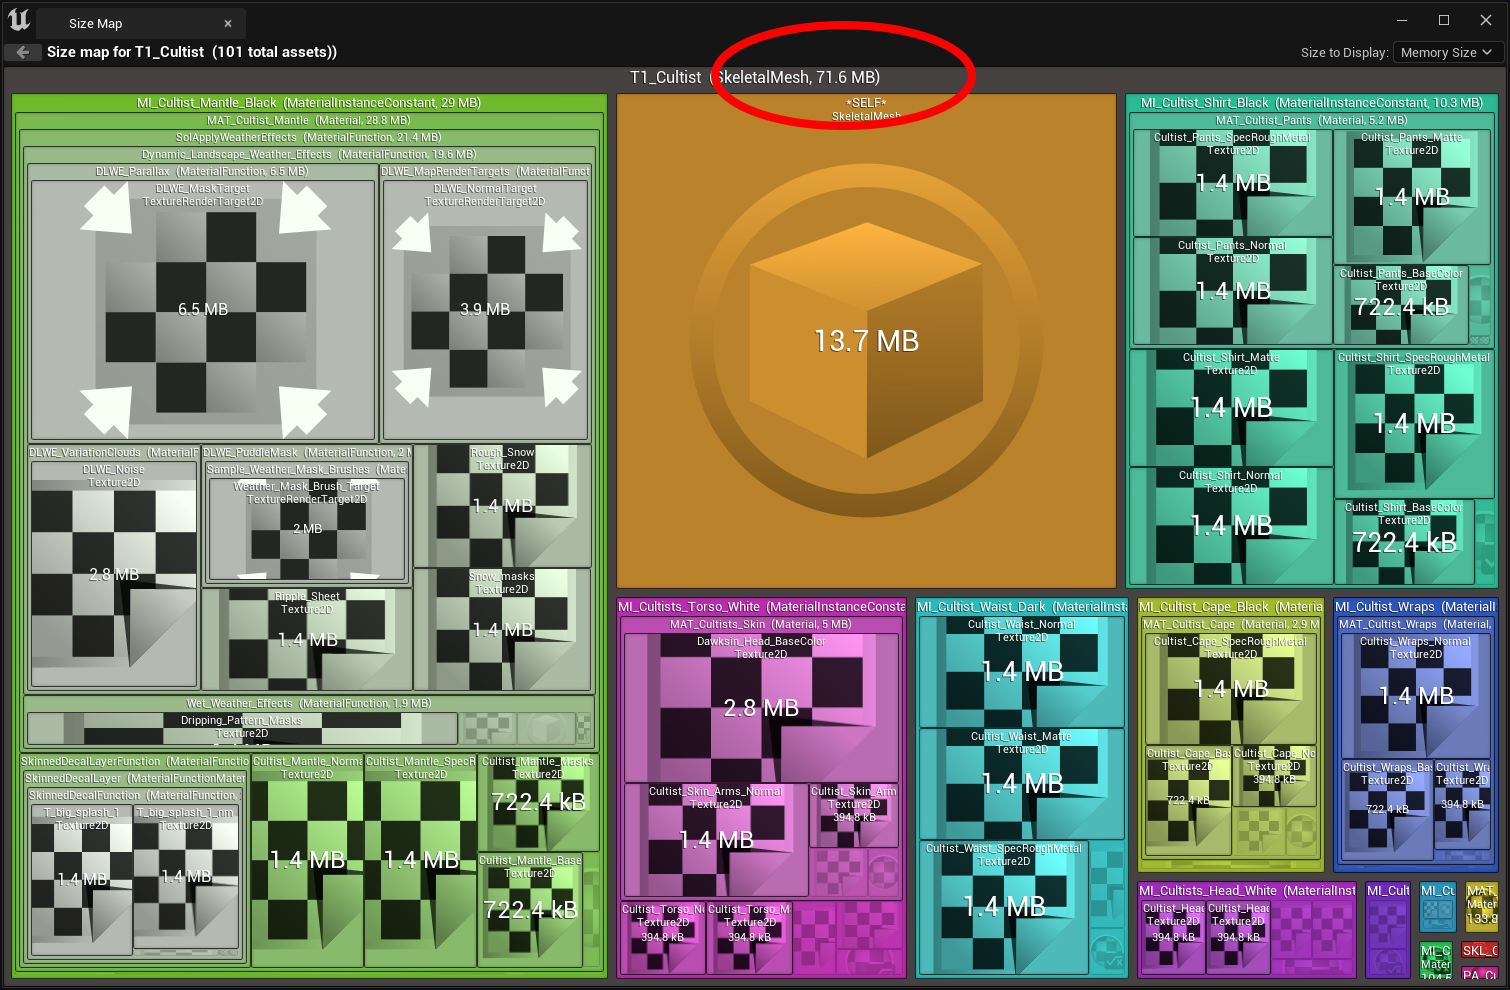
So we went in and found out how much memory each character was taking up, and as it turns out, each character was taking up roughly 1.2 -1.5 GB each. So that adds up concerningly quickly. So the answer it turns out is pretty simple. Unreal lets us change the LOD for each texture just like we would for a character. So that way, we don’t have to compress the source texture down. Which means that people with higher end machines would be able to use the textures at a higher resolution.
Wow, how convenient.
The way to do that is to look at each the character overall and reduce every texture down to its smallest size, and bring it back up slowly to see what the lowest resolution we can get away with is.
So doing that we ended up reducing the memory size down to about 80 MB for each enemy, and about double that for each hero at around 150-200MB.
While that doesn’t solve it completely, it does reduce the cost by roughly 80% for very little loss in quality. It can still be reduced further, but it would come at a significant loss in quality. So there’s still a bit more balancing to be done, but I do think we can squeeze out a bit more performance. Possibly with the lower quality modes.
Animation Updates
Now comes everyone’s favorite portion of the blog….
HOW MANY ANIMATIONS DID ANTHONY GET DONE THIS WEEK!
Its 96, Please stop yelling at me
A good third of these is the Sword Knight, since we needed him to test out a bunch of hit reactions.
Ouch
Shold is starting to get back up to speed with his locomotion for His Hammer + Shield and his 2-Handed Axe looking pretty good. Still need to get his Rock Armor finished though. Don’t have much of his melee done, but at least his light attacks are in there.
Hammer Updates! Getting there, slowly but surelyAxe Updates! No attacks ready yet :<
Fia had some minor cleanup to make her locomotion more smooth. She now has Light and Heavy In-Air attacks as well. Now she just needs standard heavy attacks to be all done with melee.
Most of the animations are locomotion updates for walking, jogging sprinting, etc, but I like to sprinkle in attacks just to keep it fresh.
Lastly, we started porting over all of the impact effects from the last project. All of the effects were enhanced a bit to be more visible. The impact effects are all based of the type of surface you’re hitting, and the current list we support is:
Sand
Stone
Ice
Wood
Snow
Flesh (Characters)
Grass
Metal
Water
Dirt
Behold, PARTICLES
Each one spawns its own different impact effect, and its also based on your weapon type. Currently we only support, sharp and blunt weapon types, BUT we’re going to be adding more as we go.
For example, we cant use blunt or sharp effects, if you’re using a spell like a fireball. We’d need to add fire effects to any impact as well. This also lets us bundle sounds with the effect, but we’re not quite there yet.
Been a bit since I’ve been able to take the time to put out a blog and so much has happened.
First, our Kickstarter Campaign was successful! Super nervous about the Kickstarter not being funded because everyone on the team put in so much work to make the content shown on the Kickstarter. Rod spent a ton of time getting the Kickstarter Trailer just right even though he had to use the old build of Mortal Rite (0.5.3) with the newer content in it and that build had bad framerate issues. But that’s expected, right? Sill in development and we haven’t been able to optimize yet.
Let’s dive in to what I’ve been up to on the game itself.
Editor Time Persistence
Placer with Sword Knight, which now behaves properly.
Ran into an issue where our placers weren’t persisting our settings between edits. What would happen – sometimes – is that an edit would be made (such as rotating an enemy via placer or changing a spawn setting on the enemy via placer) and then (at runtime in editor or when the level was reloaded) the change wouldn’t take effect. So, I tracked this down to the edits not marking the placer or the enemy dirty so that the changes are persisted, figured out how to mark the needed bits as dirty, and now that all works as intended. This is one of those things that isn’t exciting and it took a while to figure out, but was necessary and now things that were already supposed to be done are now done – kind of. There is more Placer and Ai settings changes coming soon to support new gameplay that we need in the new build.
Damage Calculations
Maths
Part of our damage calculations takes target armor into account as most people would expect. The placeholder armor contribution to the damage calculations was a flat damage reduction that didn’t scale well. Example of flat damage reduction is 100 incoming damage and 20 armor would yield 80 damage. Literally Damage In– Armor = Damage Out. This doesn’t scale well because you can outpace incoming damage with armor fairly easily. There is a place for flat damage reduction, but I don’t think armor is it.
After doing some research, we now have armor calculations that can scale infinitely, takes armor penetration into account, which we didn’t have before, and scales well with target level. No specifics on how this works to keep things hush, hush for now.
Generic Ai Ability Traces
People are often curious how the Ai makes decisions. As soon as I gather my thoughts about how our Ai decides what to do to try to explain it, I kind of give up on explaining it because there is so much going on at an implementation level. So, it roughly comes down to:
Ai can run abilities. Abilities range from an advance ability that moves the Ai into melee range to use a melee attack to a special attack that is only used when it makes sense to be used.
Ai will, basically, run the ability with the highest score. Filtered abilities have a 0 score and are rejected.
Ai collect information from their environment about targets: range, LOS, various statuses, etc.
Some abilities have cooldowns.
Ai have a Tag Relationship Mapping between target statuses and abilities that determines which abilities it can use from a pool of abilities each time it evaluates what ability it should be using.
Ai can – now – also use generic traces to determine which abilities to use.
In the previous project, Ai would do a base pass on each ability to determine a if it could run an ability. It would reject abilities based on settings, such as if a target was not in line of sight and the ability needed the target to be in line of sight, the Ai would reject the ability immediately.
Old Project: Ability Logic snippet.
Old Project (Mortal Rite 0.3.x through Mortal Rite 0.5.x): Evaluate base score and filter abilities based on ability criteria in C++. If this filtration passed and there is a Blueprint implementation for the scoring function, run the Blueprint Scoring Function to get the final score of the ability. If this filtration passed and there is no Blueprint Scoring Function, use the base score as the final score.
Downsides here were having to kick out to a Blueprint function to get a final score. This was actually used quite a bit in order to get final scores. It was convenient because Blueprints are convenient, but Blueprints have a higher overhead compared to C++, and it was generally hard to maintain. Each ability ended up having its own Blueprint Scoring Function implementation and while there were some that were similar to each other so you could copy and paste between abilities, most were unique implementations with completely unique logic.
One of the most important things done in the Blueprint Score Function in the old project was tracing to determine if an ability should be used (not LOS. LOS is part of an earlier check). A lot of the Ai use abilities that can damage a specific area or need to know if it will be able to damage one or more targets if used. Example of this is you have an ability like the Sword Knight Explode Ability where if the Sword Knight felt overwhelmed he would use explosion to push everyone back and recover. One of the deciding factors to use this ability is if one or more targets is within the range of his explosion. If there is nothing within range, he should not use the ability even if he feels overwhelmed. Intelligent.
Ai Ability Trace Configuration UI
New Project (Mortal Rite 0.6.x+): Filter using Tag Relationship Mapping, score based on criteria, if there are traces configured run the traces. If a trace fails the ability cannot be run. If all traces succeed, the ability score is returned so that this ability can be sorted.
New Project: Ability Logic snippet – Failure during one of the configured traces.New Project: Ability Logic Snippet – Traces succeeded.
Currently, I have 100% of all Ai ability decision making in C++.
The goal is to allow everything that was being done in Blueprints in a non-reusable way to be done in C++ via configuration in a reusable way.
So, what happens when this is all put together? Let’s find out.
Test Scenario
Explode Ability – Test Scenario Trace Configuration
Sword Knight that is setup to acquire targets and then can only use his Explode Ability. The Explode ability is setup to be used whenever a sphere trace in front of the Sword Knight (X: 200, Y: 0, Z: 0 relative to the Sword Knight’s forward vector) is triggered with a hostile Pawn (in this case it’s me as Dawksin).